Showing posts with label Breakfast. Show all posts

9.21.2013

Breakfast Chocolate Protein Smoothie (minus the powder)

I really like getting my nutrition from food as much as possible (although I do take supplements as well).  I eat so many protein-rich foods, I've never bothered with protein powder in my smoothies.  Just protein food, and other nutrient-rich foods.  Worse thing in this smoothie?  Honey.  


So these days my go-to breakfast is a thick, chocolatey protein smoothie.  Almost every morning.  Fills me up and holds me until lunchtime (probably because I drink about almost 30 oz - yes, you read that right).


You will want to adjust this recipe to your own taste.  Here's what I do (more or less):

Chocolate Protein Smoothie

  • 3/4 - 1 cup low-fat milk
  • 3 - 4 oz low-fat plain greek yogurt (greek yogurt is much higher in protein than regular yogurt)
  • 1 banana (I use them just barely ripe, before they develop all that sugar)
  • 1 - 2 Tbs organic peanut butter or almond butter (don't like nut butters?  No worries. Use 1 Tbs and you won't taste it).
  • a handful of organic blueberries or strawberries
  • a handful of organic baby spinach (can't taste it)
  • 1 - 2 Tbs organic chia seeds and/or ground flax seed
  • 1 rounded Tbs unsweetened cocoa
  • 1-2 tsp organic honey
  • 5 ice cubes
Add the milk to your blender.  Then add everything else.  Blend until ...well.... blended (30 seconds if you're lucky enough to have a Vitamix).

Tastes like a chocolate smoothie.  I think this makes about 32 oz.  Probably plenty for two people.  Unless you're me.

Stumble Upon Toolbar

7.17.2011

Gluten-free Ricotta Strawberry Crepes


I get hungry all over again just when I look at them.

I grew up eating 'blintzes,' which is basically Cottage or Ricotta cheese enclosed in a crepe, sometimes with fruit. We bought them frozen, and heated them up until cooked through. I loved those blintzes. So much, that in later years, I would buy them frozen, and heat them up. Definitely brought me back to my childhood. Comfort food.

Well, no need to do **that** anymore. While these are not quite the same as the paper thin crepe folded around sweetened Ricotta cheese, these are even better! This 'recipe' is really just an invitation to get creative with your own Ricotta fillings. Just make it up! That's what I did.

I used the crepe recipe I blogged a while back. Very quick prep, and no special equipment needed.

For this recipe, I wanted to keep the refined sugar content down - keeping it a little more savory than sweet. But you can adjust the amount of sweetener to your own taste. I diced fresh strawberries to incorporate into the mixture, which ensured strawberry in every bite. Yum!


Use your favorite crepe recipe, or mine

Here's what I did for the filling:

Strawberry Ricotta Cheese Filling for Crepes

Ingredients:

  • 3/4 Ricotta Cheese (I used skim)
  • 2 Tbs Greek Yogurt
  • 2 tsp Organic Agave (or your choice of sweetener)
  • 4-5 Strawberries, diced and then placed on a paper towel

Directions:
  1. Wash and dice the strawberries first, and put them on a paper towel to dry out a bit.
  2. Whisk together the cheese, yogurt, and sweetener
  3. Add in the strawberries and mix gently.
  4. Place a crepe on a plate, and put a few tablespoons of filling on one side, leaving about 1/2 inch border (don't put too much or it will be hard to roll).
  5. Roll it up from the filling side, ending with the seam side down.
  6. Repeat, eat, enjoy!

Now it's your turn.. how are you going to make your Ricotta filling?


Stumble Upon Toolbar

12.31.2010

Gluten-free French Pancakes (aka Crepes)


Happy New Year!


I haven't had much time to post recipes this year, but I thought I could add one you might like to try on New Years morning. Hopefully I will have more time in the New Year.

This was so easy convert to gluten-free (I love when that happens). The original recipe is from Joy of Cooking and it's one that I used to make for my kids - it is one of their favorites.

It's a great breakfast recipe because it's quicker to make than regular pancakes, but just as satisfying. The bad news is you can't make them on a griddle - so you can only make one at a time (challenging if you have more than one kid:-) - or you can use two frying pans if you have them.

When I make them, they are not quite as thin as traditional crepes made using a crepe pan (which cooks on the upside-down bottom of the pan). I could probably make them thinner if I used less batter - I'll have to try that some time. But they are definitely thin enough to roll up with your favorite filling if you choose.

The original recipe says to cook them in a few drops of oil in the pan, which I did. They were fine that way, but I also tried cooking them in a tiny bit of butter instead, and I liked the way they tasted even better. No surprise there, I guess.

Gluten-free French Pancakes (adapted from Joy of Cooking)
Makes about 6 - 6"-7" Pancakes

Ingredients:
  • 3/4 cup your favorite Gluten-free Flour Mix
  • 1 tsp Baking Powder (not needed if your Gluten-free flour mix has it)
  • 1-2 Tbs Powdered Sugar
  • 1/2 tsp salt
  • 1/4 tsp Xanthan Gum (not sure if this is needed - I'll try it without next time)
  • 2 Eggs
  • 1/3 cup water
  • 2/3 cup Milk
  • 1/2 tsp Vanilla Extract

Directions:
  1. Sift together the flour, salt, baking powder, xanthan gum, and powdered sugar and set aside.
  2. Beat the 2 eggs. Add the milk, water, and vanilla and beat.
  3. Make a well in the dry ingredients, and add the egg mixture. Mix together, but don't worry if there are small lumps in the batter.
  4. In a small frying pan (mine is about 7", but you can use even a smaller one) heat a bit of oil or butter.
  5. Add about 3 or 4 Tbs of batter, and swirl it around so it covers the bottom of the pan.
  6. Cook over medium heat until the bottom is lightly browned, and carefully flip over. The second side usually cooks more quickly than the first side - so watch it carefully.
  7. Enjoy with your favorite topping!


Stumble Upon Toolbar

9.14.2010

Gluten-free Waffles!


Just because sometimes I really want a Waffle! And because I can't always get to Sfoofs, my very favorite cafe for Gluten-free waffles.

So it was a "do-it-yourself" morning. Except I planned it last night. That's because this is a yeast-based waffle which is easiest and tastiest when you make batter ahead of time and let it rise in the refrigerator overnight. When you think of it, it's really a great idea. Because then all you have to do in the morning is fire up the waffle iron and bake away. Easy peasy. And if you're really good, the coffee is brewed by the time your first waffle is ready.

I remember going to the World's Fair in New York when I was a kid, and having my first Belgian Waffle with powdered sugar, whipped cream, and strawberries. It became one of my favorite treats, and still is! Unfortunately, I had no whipped cream or strawberries on this morning, so maple syrup and bananas had to fill in. No complaints.

The thing that I love about these particular waffles is that they are crisp on the outside, but soft and waffley on the inside. Perfect!


Gluten-free Waffles
Makes about 6 - 7" Waffles
Ingredients:

  • 3/4 cup Brown Rice flour
  • 3/4 cup White Rice flour
  • 1/4 cup Tapioca Starch
  • 1/4 cup Potato Starch
  • 2 tsp Yeast
  • 1 1/2 tsp Xanthan Gum
  • 1/2 tsp salt
  • 2 tsp Sugar
  • 1/4 cup Butter, melted
  • 2 cups milk, warmed to about 100 - 105 degrees
  • 2 Eggs
  • 2 tsp Vanilla Extract

Directions:
  1. Combine the flours, yeast, xanthan gum, salt, and sugar in a bowl and whisk together to blend.
  2. Combine the melted butter and warm milk, and add to the flour mixture.
  3. Mix the eggs and vanilla together, and whisk into the flour mixture to blend well.
  4. Cover with plastic wrap and put in the refrigerator overnight.
  5. In the morning, mix the batter for a few seconds.
  6. Preheat the waffle iron, and add 1/2 - 1 cup of batter, depending on the size of the waffle iron.
While the waffle is cooking, gather up your toppings: fruit, syrup, jam, etc.


Leftovers can be frozen in a freezer bag, putting parchment or wax paper between layers of waffles. Then just thaw briefly, and put in your toaster to reheat. *Almost* as good as fresh!


Stumble Upon Toolbar

8.27.2009

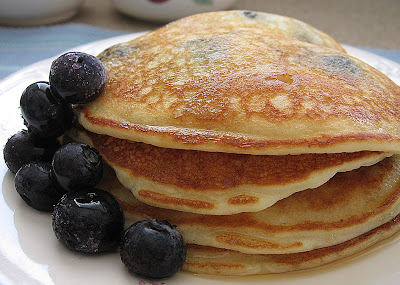
Gluten-free Blueberry Pancakes


For when you're not in a rush! Every now and then there is that morning where you can actually slow down and have a relaxing breakfast. What a treat! Here's my favorite recipe for gluten-free pancakes. I don't know if it's because I haven't had a regular pancake in a looonng time, but these don't taste gluten-free to me. They taste like ...well.... pancakes. They are light and fluffy. I happen to have a lot of frozen blueberries at the moment because I stocked up when they were at their peak and the price was low - so they were perfect for these pancakes. I added them still frozen - no need to thaw. You can add any fruit, or anything else you want to the batter (I didn't say it, but you know I'm thinking chocolate chips :-).

I have an electric griddle that I like to use for pancakes. (Did you hear the one about the 500 mini-crumpets I made on this griddle....?? LOL). You can use a frying pan and make one at a time, but griddles are nice because you can make a bunch together. Here are two of the three I made at one time.


With pancakes, you want to cook the first side until the batter starts to bubble before you flip them. Call me crazy, but there's something very satisfying about flipping a pancake :-)


What's a good pancake stack size to you? 2? 3? More????


These really were good!


And I must have been really really hungry!


Oy....


You can use all White Rice flour or all Brown Rice flour, or combine the two to equal 1 cup. I also sometimes use half Buckwheat flour, and/or add ground Flax Seed (superfood!) for additional nutrition and fiber. I made 9 large pancakes from this batter. Needless to say, I froze the rest for another day. Honest, I did!!

Gluten-free Blueberry Pancakes

Ingredients:

  • 1 cup Rice Flour (brown and/or white/or half buckwheat)
  • 3 Tbs. Tapioca Starch/flour
  • 1/3 cup Potato Starch
  • 1/4 tsp. NuStevia powder (or 1 Splenda packet), optional
  • 1 tsp. Baking Soda
  • 1 1/2 tsp. Baking Powder
  • 2-4 Tbs. Ground Flax Seed (optional)
  • 1/2 tsp. Salt
  • 1/2 tsp. Xanthan Gum
  • 4 Tbs. Buttermilk Powder (*see note)
  • 2 Eggs, lightly beaten
  • 1/2 tsp. Vanilla
  • 1 1/2-2 cups Water, approximately (I sometimes use half milk/half water; use the lesser amount if you like a thicker pancake)
  • 3 Tbs. Canola Oil (I sometimes use melted butter)
  • 1 cup blueberries, frozen or fresh


*Note: if you don't have buttermilk powder, you can leave it out, or use milk instead of water. You can even add a little lemon juice to the milk to give it a little tang if you want to.

Directions:
If you're using an electric griddle, preheat it to about 350 degrees. Otherwise, heat your frying pan or gas griddle as you normally do. I usually add a little butter.

  1. Combine all of the dry ingredients in a bowl and mix well.
  2. Add the water, vanilla, eggs, and oil and beat just until blended. A few lumps are OK.
  3. Pour onto hot pan. When they start to form bubbles, flip and cook the other side until golden brown.
  4. Serve them up with your favorite toppings!


Tip: To get an 'even' spread of blueberries in your pancakes, instead of adding them to the batter, drop them one by one onto each pancake after you pour them on the griddle. This also keeps them from breaking up in the batter and turning the batter blue :-)



Stumble Upon Toolbar

8.24.2009

Banana Oatmeal Chocolate Bar - Breakfast on the Run

Here we have it. Completely Healthy. And Gluten-free. And No Added Sugar. And Vegan. Any other requests??? This dense, chewy breakfast or snack bar is completely no-guilt and very satifying. It's great with a hot cup of coffee, or a cold glass of milk. I'm pretty sure these are very kid-friendly, too.

Like so many things I bake these days, you can add other ingredients to make it your own. I think sunflower or pumpkin seeds would be good, and maybe a little cinnamon. These keep for a few days at room temperature. Personally, I like them cold, so I keep a few in the refrigerator, and freeze the rest, thawing as needed.

And no matter what I tried, I could not make these look pretty in the picture (they do, however, look better in person though, like so many of us ;-)


Hmmmmm..... maybe this one.


Oh well.... never mind...

Banana Oatmeal Chocolate Bar - Breakfast on the Go (Gluten-Free, No Added Sugar, Vegan)

Ingredients:

  • 2 cups Rolled Oats
  • 2/3 cup finely chopped or ground Almonds
  • 1/3 cup unsweetened Coconut
  • 1/2 tsp Salt
  • 4 oz good quality bittersweet or dark Chocolate, chopped small
  • 14 oz of very ripe Bananas (about 4 bananas)
  • 1/2 tsp. Vanilla
  • 1/4 cup Peanut or Almond butter
  • 1/2 cup Dried Fruit (I like cherries or apricots)

Directions:
Preheat oven to 350 degrees (F). Grease or line a 9 X 9 baking pan.
  1. In mixing bowl, combine the oats, ground almonds, coconut, and salt. Set aside.
  2. In another bowl, combine the bananas, vanilla, and nut butter. Mash thoroughly.
  3. Add the Oatmeal mixture to the bananas and mix well.
  4. Gently add in the chopped chocolate and dried fruit.
  5. Spread mixture evenly in the prepared pan, and bake for about 25 minutes.
  6. Let cool completely before cutting into whatever size bars you wish.

Easy, huh?


Stumble Upon Toolbar